
RNN, LSTM with Tensorflow
Recap
Over the past three months, I’ve been hesitant to upload new contents on this blog for a variety of reasons, including, but not limited to, working as a part-time math instructor, and trying to catch up to what has otherwise been a very busy semester. In particular, while attempting to complete a CS project for one of my classes (building an RNN-based fake news classifier), I had to dig through the contents of the highly accaimed CS224n course, learning about RNNs and language models from scratch. Nonetheless, after reviewing CS224n lecture materials for a whole semester, I came to two conclusions: one, my supposed understanding of core theories/practices of the NLP field fell short of the rigorous emphasis placed on the fundamentals of NLP models/inner workings by CS224n, and two, I needed more practice with certain topics like matrix calculus.
Until now, I didn’t post any materials related to RNNs and language models, but after realizing just how much more there was for me to learn about them, I decided to make several posts–starting with this one on basic RNN implementation with Tensorflow. I hope that this effort can serve as the foundational stepping-stone for more advanced topics in the future.
Implementation
To create this brief implentation practice of RNN with Tensorflow, I made frequent references to this blog post by Sergio Virahonda. The sample dataset, consisting of about 20,000 real news articles and 18,000 fake ones, comes from Clément Bisaillon, uploaded on Kaggle in 2019.
Let’s start by importing all the necessary modules.
import pandas as pd
import numpy as np
import tensorflow as tf

from sklearn.model_selection import train_test_split

from keras.models import Sequential
from keras import layers
from keras.layers import LSTM

from keras.callbacks import ModelCheckpoint
Then import the previously downloaded csv files using .read_csv(), a function provided by pandas. I stored the fake article dataset on a DataFrame object called df1, and the real article dataset on df0.
df1 = pd.read_csv("Fake.csv")
df0 = pd.read_csv("True.csv")
Finally, label the sentences to indicate whether they are real or fake.
- Append 0 to a new column of True.csv called
label. - Append 1 to a new column of Fake.csv called
label.
labelFake = []
for i in range(len(df1.index)):
  labelFake.append(1)
df1['label'] = labelFake

labelTrue = []
for i in range(len(df0.index)):
  labelTrue.append(0)
df0['label'] = labelTrue
Because I trained the simple RNN model on the titles only, I removed the unnecessary part of the datasets–the three columns from both DataFrames called ‘subject’, ‘date’, and ‘text’. But depending on which part of the dataset one may wish to train the model on, this step may be unnecessary.
Finally, concatenate the two frames to acquire dfFinal—the final form of the DataFrame object storing the sentences.
framesF = [df0, df1]
dfFinal = pd.concat(framesF)
display(dfFinal)
| title | label | |
|---|---|---|
| 0 | As U.S. budget fight looms, Republicans flip t... | 0 |
| 1 | U.S. military to accept transgender recruits o... | 0 |
| 2 | Senior U.S. Republican senator: 'Let Mr. Muell... | 0 |
| 3 | FBI Russia probe helped by Australian diplomat... | 0 |
| 4 | Trump wants Postal Service to charge 'much mor... | 0 |
| ... | ... | ... |
| 23476 | McPain: John McCain Furious That Iran Treated ... | 1 |
| 23477 | JUSTICE? Yahoo Settles E-mail Privacy Class-ac... | 1 |
| 23478 | Sunnistan: US and Allied ‘Safe Zone’ Plan to T... | 1 |
| 23479 | How to Blow $700 Million: Al Jazeera America F... | 1 |
| 23480 | 10 U.S. Navy Sailors Held by Iranian Military ... | 1 |
44898 rows × 2 columns
Now that we have the news article titles and their labels in a somewhat organized format, now comes the conversion of the data into integer arrays that will be fed into the recurrent neural network. To do that, first convert the titles column into a numpy array to feed into RNN layer.
titles = np.array(dfFinal['title'])
print(titles[:10])
['As U.S. budget fight looms, Republicans flip their fiscal script'
 'U.S. military to accept transgender recruits on Monday: Pentagon'
 "Senior U.S. Republican senator: 'Let Mr. Mueller do his job'"
 'FBI Russia probe helped by Australian diplomat tip-off: NYT'
 "Trump wants Postal Service to charge 'much more' for Amazon shipments"
 'White House, Congress prepare for talks on spending, immigration'
 'Trump says Russia probe will be fair, but timeline unclear: NYT'
 'Factbox: Trump on Twitter (Dec 29) - Approval rating, Amazon'
 'Trump on Twitter (Dec 28) - Global Warming'
 'Alabama official to certify Senator-elect Jones today despite challenge: CNN']
Then convert the label column into a numpy array to feed into the RNN layer.
labels = np.array(dfFinal['label'])
To train a RNN model on sentences, it is necessary to change sentences into sequences of integers. This is done in three steps:
- Make
tf.keras.preprocessing.text.Tokenizer()object - “Update internal vocabulary” of the tokenizer object by using
.fit_on_texts() - Convert sentences to lists containing integers by using
.texts_to_sequences()function of the tokenizer object.
According to the official Tensorflow guide website, the function .fit_on_texts() of the tokenizer object is required before using .texts_to_sequences(), which makes sense because the tokenizer object needs to know the complete vocabulary in the list of sentences to be able to change sentences to integer sequences.
Let’s go through the steps one-by-one.
- Make
tf.keras.preprocessing.text.Tokenizer()object
tk = tf.keras.preprocessing.text.Tokenizer(num_words=4000)
- “Update internal vocabulary” of the tokenizer object by using
.fit_on_texts()
tk.fit_on_texts(titles)
- Convert sentences to lists containing integers by using
.texts_to_sequences()function of the tokenizer object.
tempSeq = tk.texts_to_sequences(titles)
Now that we’ve converted the titles into integer sequences, now comes standardizing the sequences’ length to a set size, or padding, in short.
So let’s fix the integer sequences’ size by adding zero to wherever it is needed. The below shows an example of this.
Padding:

sequence = [[1], [2, 3], [4, 5, 6]]
tf.keras.preprocessing.sequence.pad_sequences(sequence)

Output:

array([[0, 0, 1],
       [0, 2, 3],
       [4, 5, 6]], dtype=int32)
paddedSeq = tf.keras.preprocessing.sequence.pad_sequences(tempSeq, maxlen = 400)
labels = tf.keras.utils.to_categorical(labels, 2)


labels
array([[1., 0.],
       [1., 0.],
       [1., 0.],
       ...,
       [0., 1.],
       [0., 1.],
       [0., 1.]], dtype=float32)
Now split the data into train and test groups using train_test_split(), as we have always done.
X_train, X_test, y_train, y_test = train_test_split(paddedSeq, labels)
Finally, load the necessary layers onto a .Sequential() object and train.
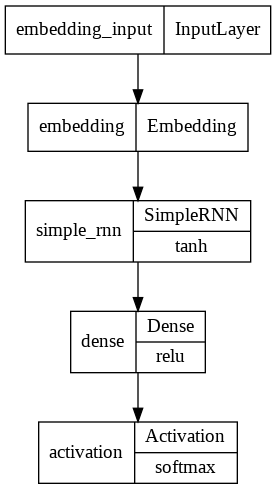
modelRNN = tf.keras.Sequential()
modelRNN.add(layers.Embedding(4000,20))
modelRNN.add(layers.SimpleRNN(10,dropout=0.5))
modelRNN.add(layers.Dense(2, activation='relu'))
modelRNN.add(layers.Activation('softmax'))

modelRNN.compile(loss='categorical_crossentropy', metrics=['accuracy'])
from keras.utils.vis_utils import plot_model
plot_model(modelRNN, to_file='model_plot.png', show_layer_names=True, show_layer_activations=True)
history = modelRNN.fit(X_train, y_train, epochs=5,validation_data=(X_test, y_test))
Epoch 1/10
1053/1053 [==============================] - 114s 106ms/step - loss: 0.2573 - accuracy: 0.9060 - val_loss: 0.1432 - val_accuracy: 0.9494
Epoch 2/10
1053/1053 [==============================] - 109s 104ms/step - loss: 0.1261 - accuracy: 0.9556 - val_loss: 0.1227 - val_accuracy: 0.9593
Epoch 3/10
1053/1053 [==============================] - 109s 104ms/step - loss: 0.1115 - accuracy: 0.9599 - val_loss: 0.1040 - val_accuracy: 0.9628
Epoch 4/10
1053/1053 [==============================] - 110s 105ms/step - loss: 0.1037 - accuracy: 0.9621 - val_loss: 0.1004 - val_accuracy: 0.9645
Epoch 5/10
1053/1053 [==============================] - 111s 106ms/step - loss: 0.1013 - accuracy: 0.9634 - val_loss: 0.0982 - val_accuracy: 0.9650
Epoch 6/10
1053/1053 [==============================] - 111s 106ms/step - loss: 0.0978 - accuracy: 0.9653 - val_loss: 0.0965 - val_accuracy: 0.9650
Epoch 7/10
1053/1053 [==============================] - 109s 104ms/step - loss: 0.0952 - accuracy: 0.9643 - val_loss: 0.0962 - val_accuracy: 0.9650
Epoch 8/10
1053/1053 [==============================] - 118s 112ms/step - loss: 0.0950 - accuracy: 0.9659 - val_loss: 0.0987 - val_accuracy: 0.9643
Epoch 9/10
1053/1053 [==============================] - 110s 104ms/step - loss: 0.0933 - accuracy: 0.9659 - val_loss: 0.0935 - val_accuracy: 0.9667
Epoch 10/10
1053/1053 [==============================] - 109s 104ms/step - loss: 0.0918 - accuracy: 0.9667 - val_loss: 0.0920 - val_accuracy: 0.9665

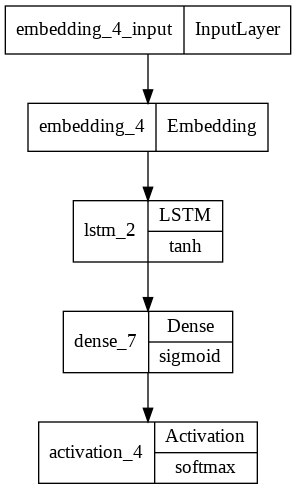
Implementing an LSTM model is similar to the above steps, but involves switching the layers.SimpleRNN component to layers.LSTM.
modelLSTM = tf.keras.Sequential()
modelLSTM.add(layers.Embedding(4000,20))
modelLSTM.add(layers.LSTM(10,dropout=0.5))
modelLSTM.add(layers.Dense(16, activation='sigmoid'))

modelLSTM.add(layers.Activation('softmax'))
modelLSTM.compile(loss='categorical_crossentropy', metrics=['accuracy'])
from keras.utils.vis_utils import plot_model
plot_model(modelLSTM, to_file='model_plot.png', show_layer_names=True, show_layer_activations=True)
history = modelLSTM.fit(X_train, y_train, epochs=5,validation_data=(X_test, y_test))
Epoch 1/5
1053/1053 [==============================] - 167s 159ms/step - loss: 0.1407 - accuracy: 0.9456 - val_loss: 0.1113 - val_accuracy: 0.9580
Epoch 2/5
1053/1053 [==============================] - 167s 158ms/step - loss: 0.1126 - accuracy: 0.9568 - val_loss: 0.1058 - val_accuracy: 0.9597
Epoch 3/5
1053/1053 [==============================] - 167s 159ms/step - loss: 0.1032 - accuracy: 0.9615 - val_loss: 0.0985 - val_accuracy: 0.9621
Epoch 4/5
1053/1053 [==============================] - 168s 160ms/step - loss: 0.0990 - accuracy: 0.9630 - val_loss: 0.0947 - val_accuracy: 0.9642
Epoch 5/5
1053/1053 [==============================] - 167s 159ms/step - loss: 0.0945 - accuracy: 0.9639 - val_loss: 0.0977 - val_accuracy: 0.9636
Conclusion
In this post, I went over creating simple RNN and LSTM models with TensorFlow–a task that originally stemmed from one of my course projects. Even though that one also involved creating a BERT model with T.F using HuggingFace’s transformers library, I felt that for the purposes of this blog, it would be more intuitive for readers (and my future self) to create a transformer-based model using Pytorch–the great alternative to TensorFlow.
One more thing, I did not yet discuss the inner workings of these RNNs and LSTMs, but the next series of blog posts will look under the hood of RNN architecture in more detail, including transformers and its cousins. For now, I mostly rely on CS224n for the purpose of studying theory, but other suggestions are always welcome. Thank you for reading.